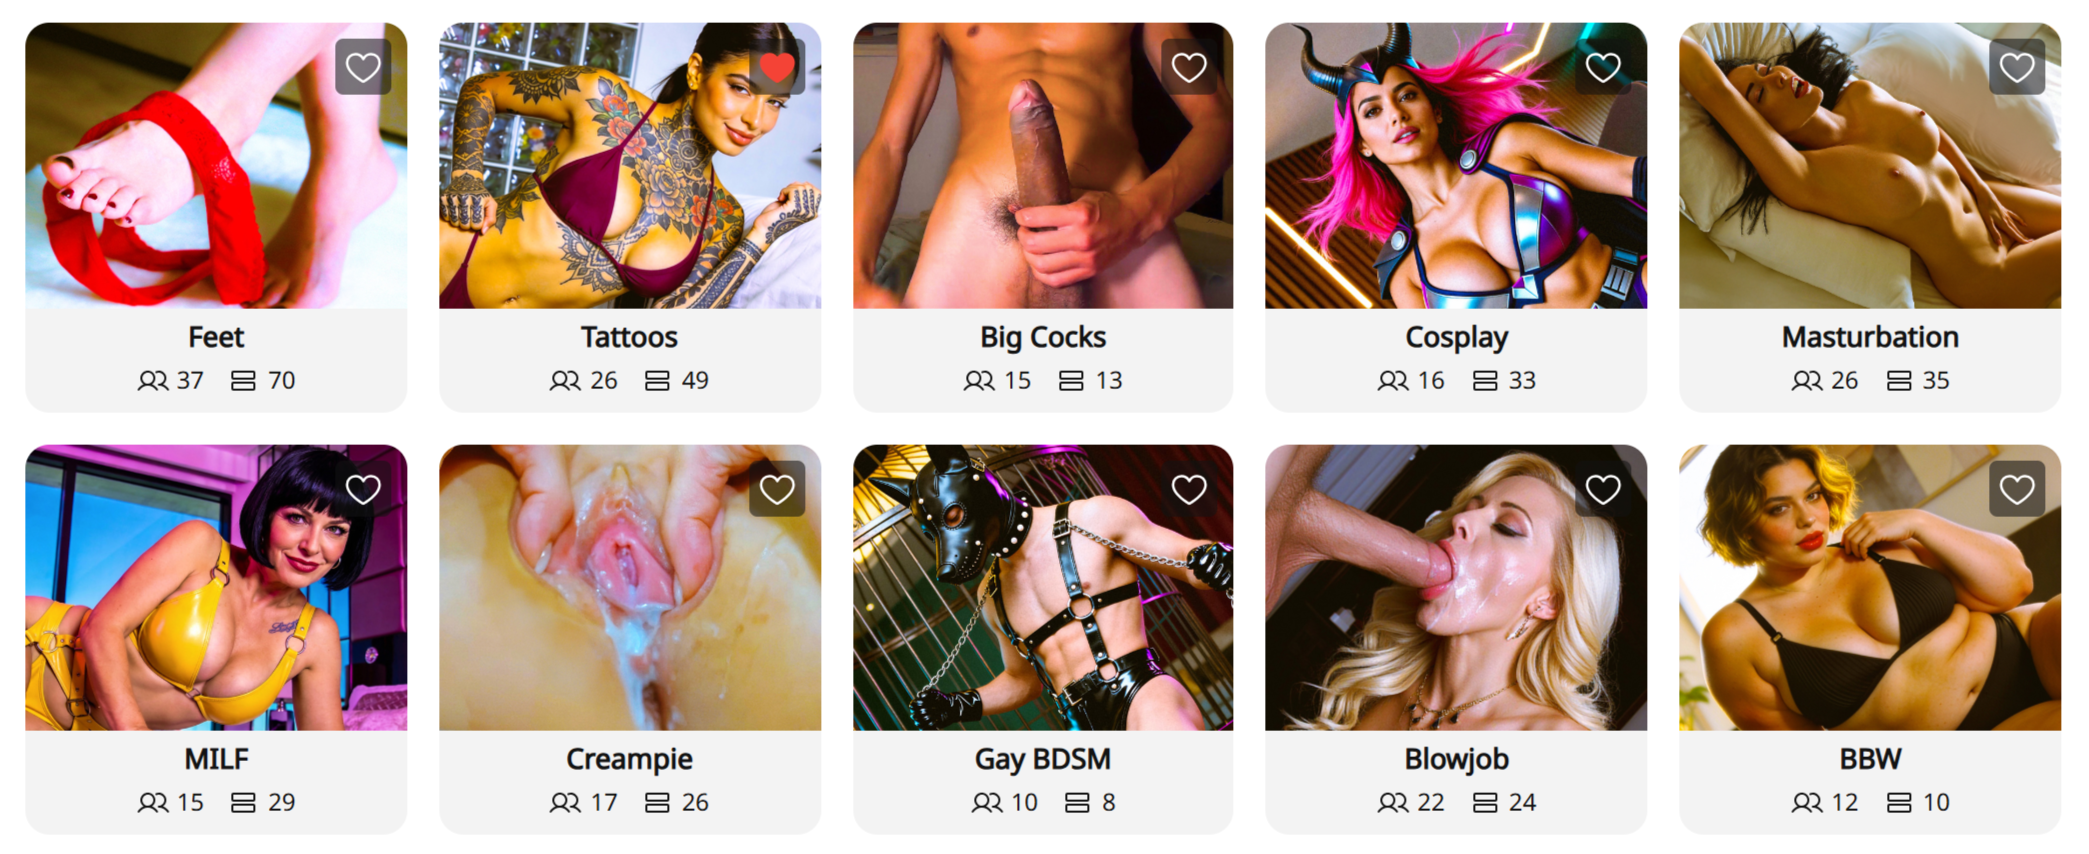
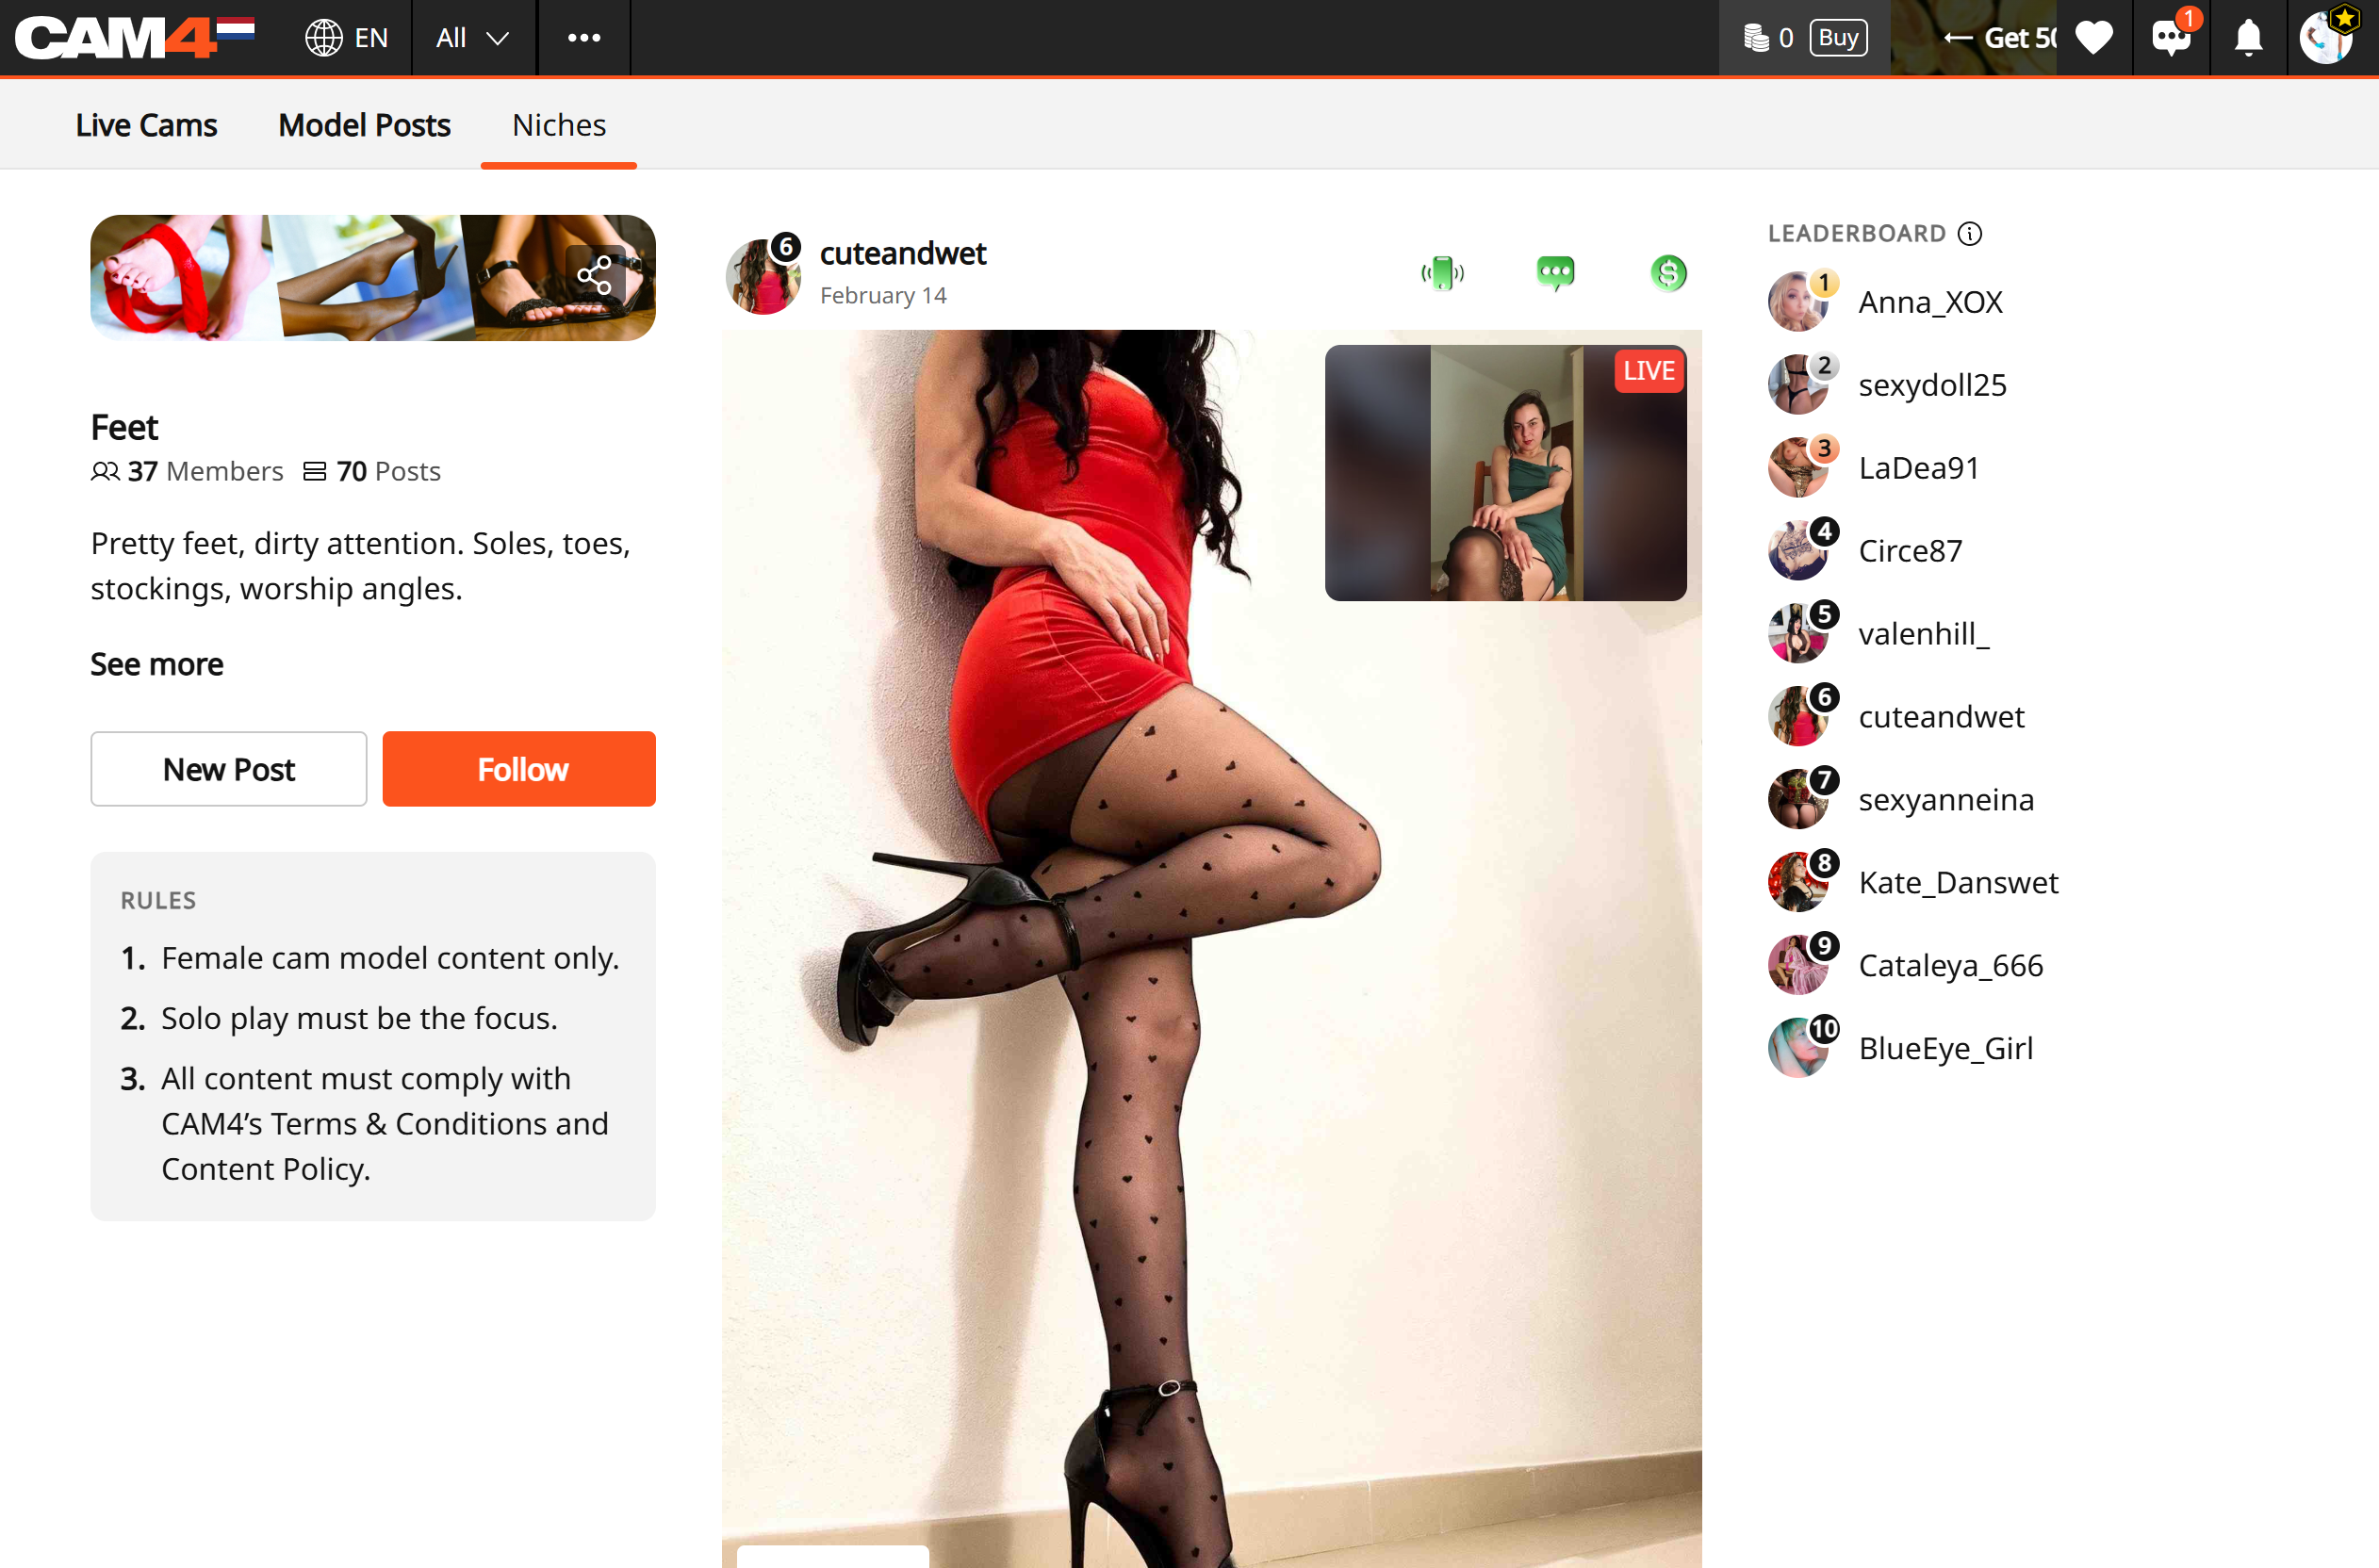
What are Niche pages? Niche pages are community spaces where you can discover and share content focused on the topics you love. These dedicated pages offer posts, media, and live models all centered around the type of content you are looking to find easily.
How to discover the kinks you like:
The Niche Directory: Click the “Niche“ tab next to “Model Updates” on the top left corner of your screen.
Search and Filter: Use the search bar to find specific interests (e.g., “Squirt” or “BDSM”). You can sort Niches by Trending, Most Popular (most members), or Recent Activity.
Explore the Options: Inside each Niche, you will find three main areas:
Posts: A feed of the latest updates and photos from various creators.
Media: A dedicated gallery where you can filter specifically for videos or photos.
Cams: A “Live Now” directory featuring only cam models who belong to that specific Niche.
How to Join Your Community:
Follow a Niche: Click “Follow” on your a Niche you like. You can then use the “Following” filter in the Niche directory to quickly see updates from the communities you’ve joined.
Connect with Cam Models: Use the Leaderboard on the right side of the Niche page to find the most popular and active creators in that category. Clicking their name takes you directly to their profile.
Join the Conversation: Like and comment on posts to interact with cam models and other members.
Instant Access to Live Action: If a model is live, their post will show a live video preview. Simply click the preview to enter their room and start watching immediately.
Jump in and start exploring Niches! Follow a few that spark your curiosity, uncover some tempting new niches, and discover new cam models who are ready to put on a show just for you.
Your next obsession (and your next unforgettable show) could be waiting in a Niche you haven’t tried yet.
Once your Lovense device is connected, CAM4 gives you powerful tools to help you create an interactive show that boosts engagement and tips. This article focuses on how you can use those tools — while directing you to Lovense’s official setup instructions when technical details are needed.
Give Control: Let Viewers Interact in Real Time
The Give Control feature allows viewers to take temporary control of your toy through tipping. This creates a high-engagement experience that often leads to more tips and longer sessions.
Learn how Give Control works through Lovense’s guide: https://www.lovense.com/cam-model/guides/Give-Control
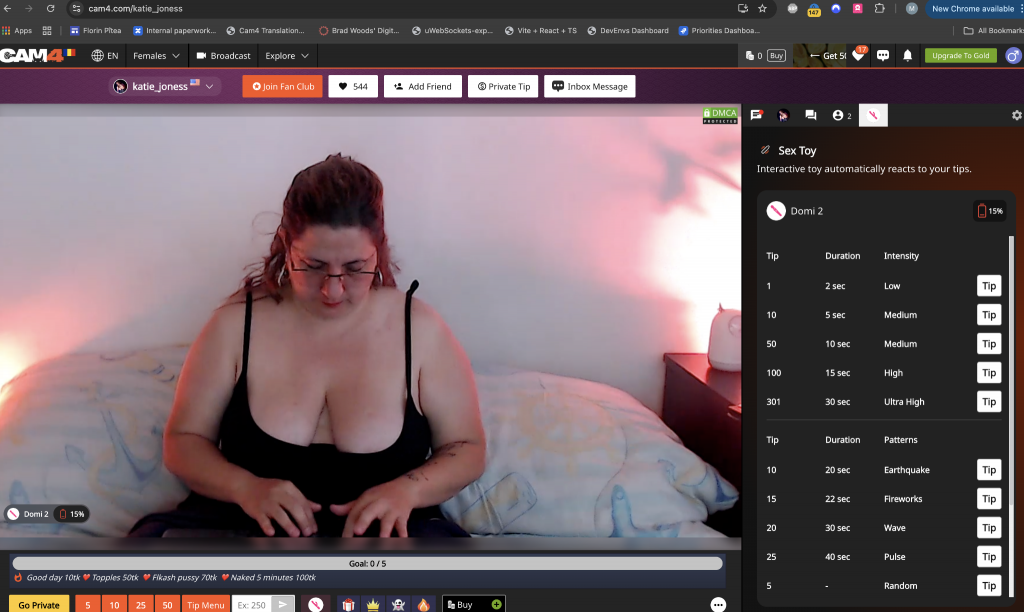
Dynamic Tip Menus
Create customizable vibration levels or patterns tied to specific tip amounts. This allows you to structure your show into tiers — from small buzzes to powerful pulses.
Lovense’s full guide: https://www.lovense.com/cam-model/guides/Dynamic-Tip-Menu
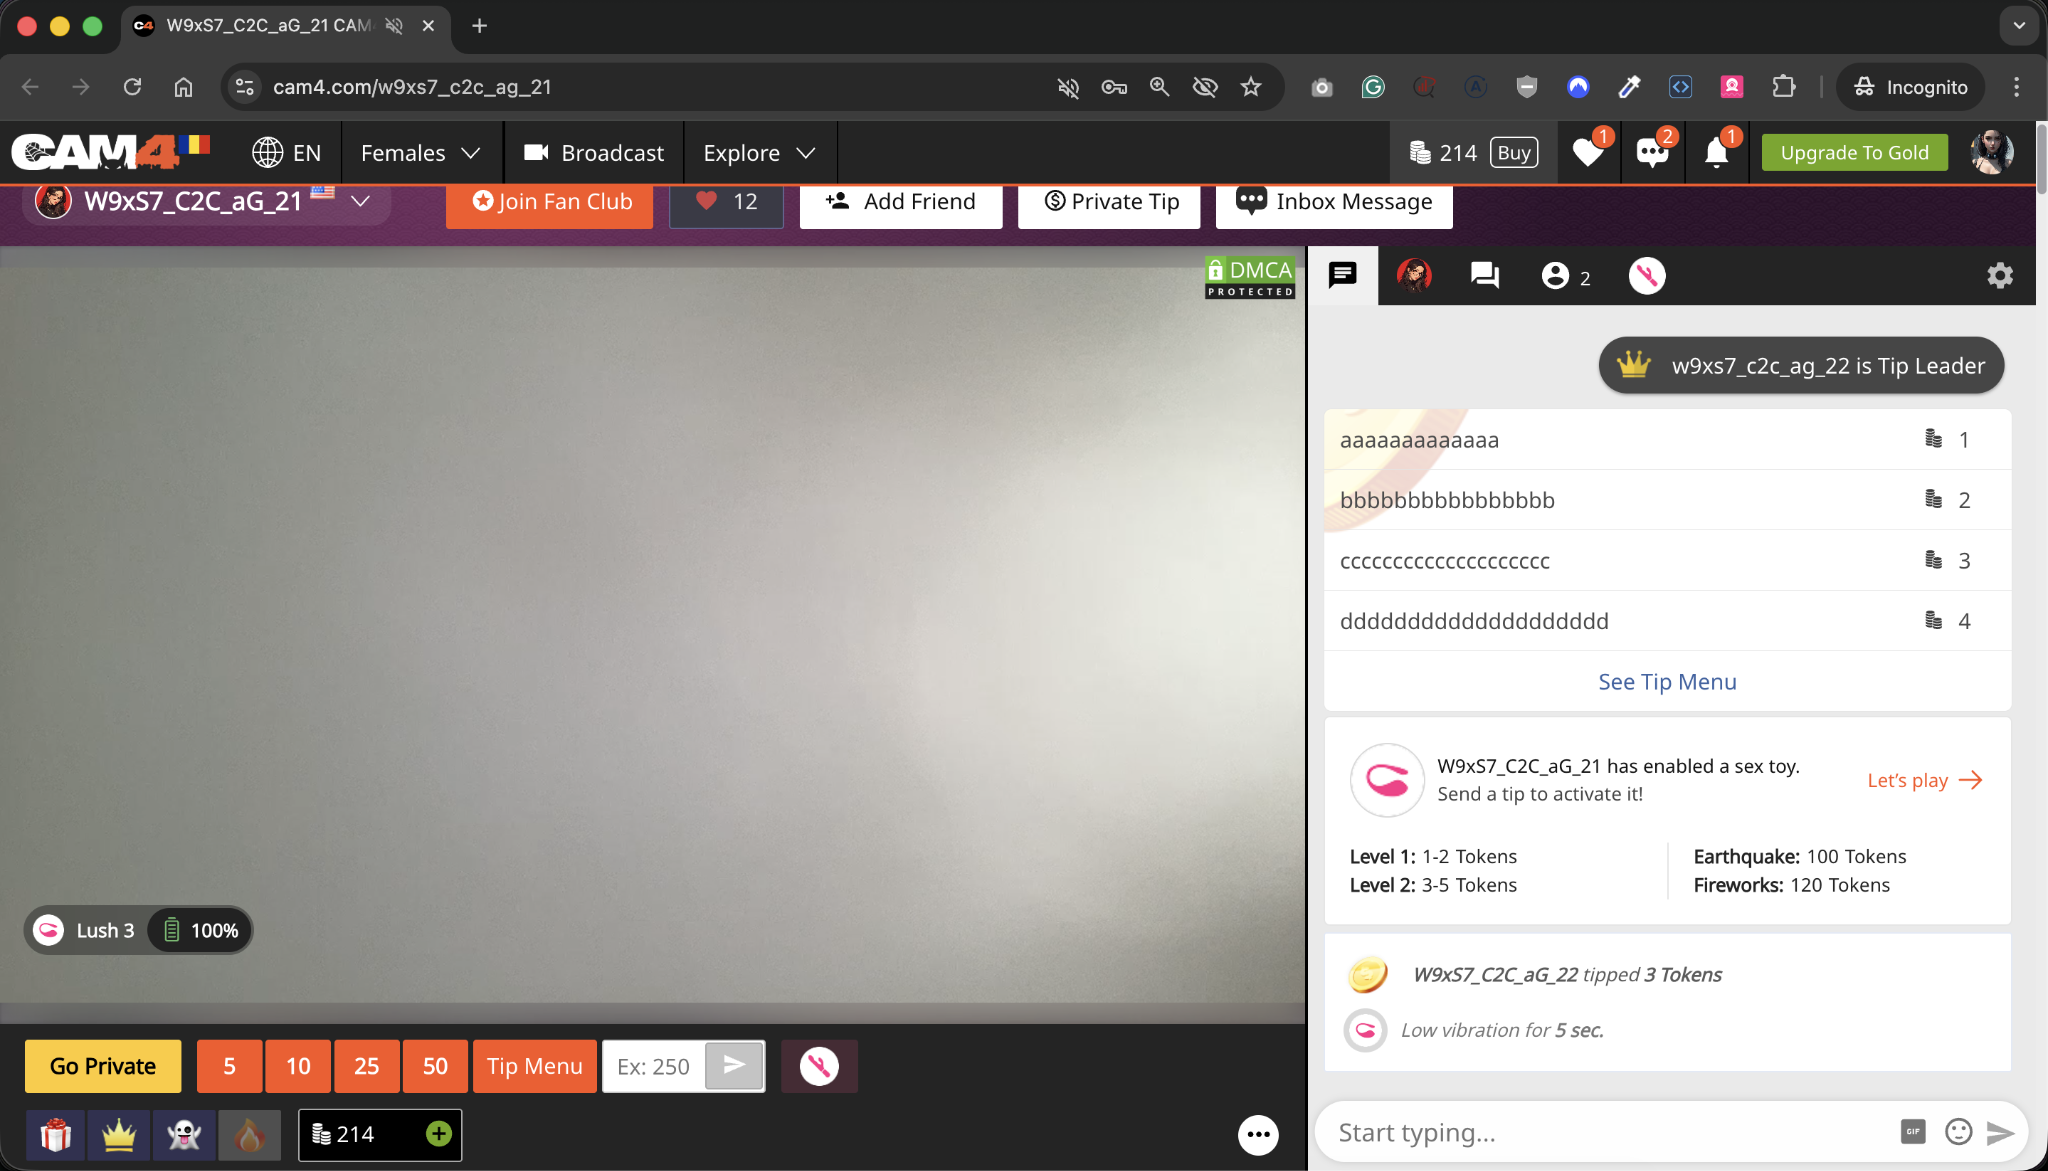
CAM4’s Built-In Interactivity Features
CAM4 enhances the Lovense experience with interactive visual tools that make effects clear for both broadcasters and viewers:
Automatic Chat Notifications
When Lovense is active, CAM4 posts:
Announcements letting viewers know your toy is connected
Teasers about available tip levels
Prompts encouraging engagement
This boosts awareness without extra effort from you.
Special Tip Notifications
Whenever someone activates a vibration level, CAM4 displays:
The username of the tipper
The amount they tipped
A label showing which vibration/level was triggered
This creates a rewarding moment for the viewer and builds excitement in the room.
Toy-Status Widget (Viewer-Side)
This small in-stream element shows:
Live toy activity
Available levels
Clear confirmation when their tip triggers a reaction
It helps viewers understand the experience and participate confidently.
Lovense Button for Viewers
This button opens a streamlined Lovense interface showing:
Your configured vibration levels
The exact amount required for each
A simple way to trigger reactions instantly
This dramatically increases tipping by removing confusion or guesswork.
Using Lovense toys on CAM4 is one of the easiest ways to add interactive excitement to your shows. CAM4 works alongside Lovense technology, so all setup and pairing steps are completed through Lovense’s official apps and guides, ensuring the instructions you follow are always accurate and up to date.
What You Need
To use Lovense on CAM4, you’ll need:
A compatible Lovense device
A smartphone/tablet with Bluetooth or a computer with a Bluetooth adapter
The Lovense Connect App or Lovense browser extension
A stable internet connection
Use the links below for the most current setup instructions:
Official Lovense Setup Guides
Set up your Lovense toys https://www.lovense.com/sextoys/setup
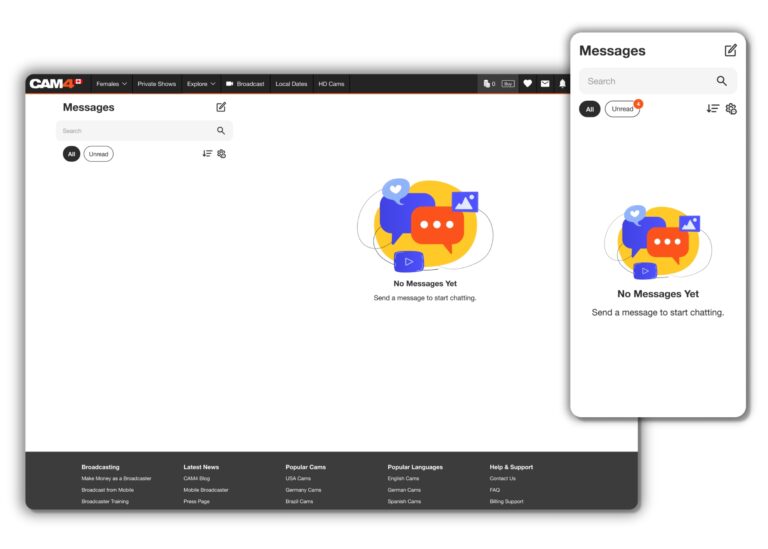
What are the key improvements introduced in the new inbox messaging system?
The new inbox messaging system brings a completely overhauled user experience and design, offering a fresh and intuitive interface. Users can explore new features designed to transform the way they interact with each other, on both desktop and mobile.
How can I start a new conversation with other users?
Click on the icon to initiate a new conversation. You can search for users using filters like recently watched or recently tipped, or simply enter their username in the search bar for real-time results.
How can I organize my conversations in the inbox?
You can filter chat threads by the most recent or oldest messages for convenient organization. Additionally, the gear icon allows you to edit existing conversations, select multiple threads for deletion, or star a thread for easy access.
What is the purpose of starring a thread?
Starring a thread places it in the starred group section for quick and easy access.
What is a Wink, and how does it work?
Non-gold users have three Winks per day, allowing them to express interest and initiate a conversation. Gold users can skip the need for Winks and directly message any user on the platform.
What media features are available in the new inbox?
Users can send various media types, including My Shop videos and galleries, directly into the thread conversation. Media can be sorted and shared with other users.
How can broadcasters benefit from the media features?
Broadcasters can share fan-only galleries, promoting themselves to users who have purchased a fan club membership
How can I reward performers with tips and gifts?
Tips and gifts can be sent directly into private threads to show appreciation for the shared content.
How does the Request Private Show button work?
Clicking the button allows users to engage in a private Cam2Cam show in exchange for tokens. This provides a more intimate space for users without the possibility of others spying on the show.
How can users rate each other after a private show?
At the end of a private show, users can rate each other. Additionally, earnings and spending for that specific session are visible in the chat.
How can I save a message or media for later reference?
Highlight a message or media and press the bookmark icon labeled “Save” to store it chronologically in the Save tab for that thread.
Are there any additional details to explore in the new Inbox Overhaul?
Yes, we encourage users to explore the system further to discover all the little details and features. Feel free to reach out to support@cam4.com if you have any specific questions or need assistance.
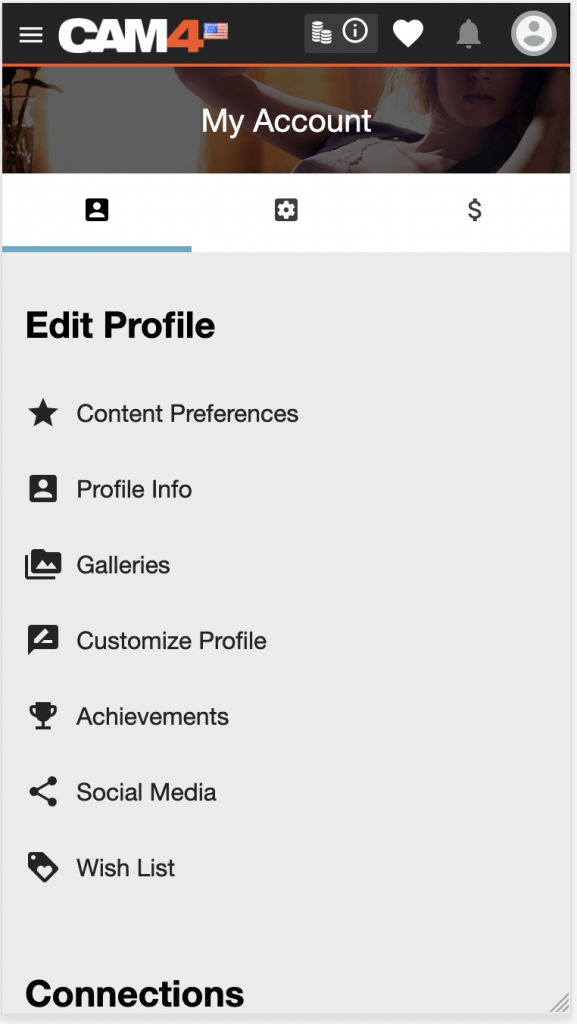
Achievements shine the spotlight on the milestones you reach as a CAM4 member. When you complete different interactions on CAM4 such as uploading photos to your profile, joining a Fan Club, or making a new friend, you can unlock an Achievement badge.
Visit the Achievements section in My Account to track your progress and explore new achievements to unlock. You can display your collection of unlocked achievements on your profile and check out what your friends have unlocked on theirs, helping you find new ways to connect with each other.
Once you’ve unlocked an Achievement, you can use that badge and title in CAM4 chat rooms to add flair to your username and stand out from the crowd! (Coming soon).
WHERE CAN I FIND MY ACHIEVEMENTS?
You can learn more about available Achievements and track your progress by visiting the Achievement page within the Edit Profile section of My Account.
Any Achievements you earn will also get featured on your CAM4 profile page.
NAVIGATING ACHIEVEMENTS
When viewing Achievements in My Account, you can browse between ALL, UNLOCKED, and LOCKED achievements.
ALL will show you a mix of locked, unlocked, and in-progress Achievements. Use UNLOCKED and LOCKED to quickly view only the Achievements you have earned or are in the process of earning, respectively.
CHANGING THE DISPLAY SETTINGS
You can choose to view your achievements in either a detailed list or a simplified grid by selecting the corresponding toggles at the top of each section
LOCKED, UNLOCKED & IN PROGRESS
Locked and in-progress Achievement badges are displayed in black and white. Once you have completed the criteria to unlock any Achievement, the badge is displayed in color. By default, all your unlocked and in-progress Achievements are moved to the top of the list, sorted by most recent.
When an Achievement requires multiple actions, for example, uploading more photos to your profile gallery, you’ll see a progress bar appear underneath the badge, which will fill as you complete these actions.
VIEWING ACHIEVEMENT DETAILS
You can tap or click any Achievement to view more details at any time. Doing so will open a panel that will display the following:
Achievement badge
Achievement title – this is the name of the achievement
Achievement description – the specific actions required to unlock the Achievement
Progress completion percentage – how much progress has been made so far toward unlocking the achievement
Rarity percentage – this indicates how common or rare this Achievement is within the CAM4 community. If less than 10% of other users have completed this goal, congratulations! You can feel proud! If lots of other people have also unlocked the same achievement, that’s great, too. It just means you have even more in common with plenty of potential new friends on CAM4.
HOW WILL I KNOW I’VE UNLOCKED AN ACHIEVEMENT?
When you unlock an Achievement, you’ll be notified in real-time. A small panel will appear in the top right corner of your screen showing you the title and badge of the Achievement you just unlocked. You can choose to interact with this panel for more information, dismiss it by clicking the “x” or simply wait and it will disappear on its own.
If you want more information but didn’t click the Achievement notification in time, not to worry – you can always visit the Achievements section inside My Account to see your unlocked Achievements; the newest ones will always be right at the top waiting for you!
CAN PEOPLE SEE MY ACHIEVEMENTS ON MY PROFILE PAGE?
Yes! Unlocked Achievements appear on your CAM4 profile page. You can also see what your friends and other CAM4 members have unlocked on their profile pages.
HELP! I COMPLETED ALL MY ACHIEVEMENTS – WILL THERE EVER BE NEW ONES?
Yes! We plan to release more Achievements regularly; make sure to subscribe and keep an eye out for news in CAM4 email announcements and follow us on Twitter for all the latest news and updates.
HELP! I COMPLETED AN ACTION, BUT MY ACHIEVEMENT DIDN’T UNLOCK!
We’re here to help! If you feel you’re missing an Achievement for an action you’ve completed, we want to know – you can get in touch with us at https://www.cam4.com/contact
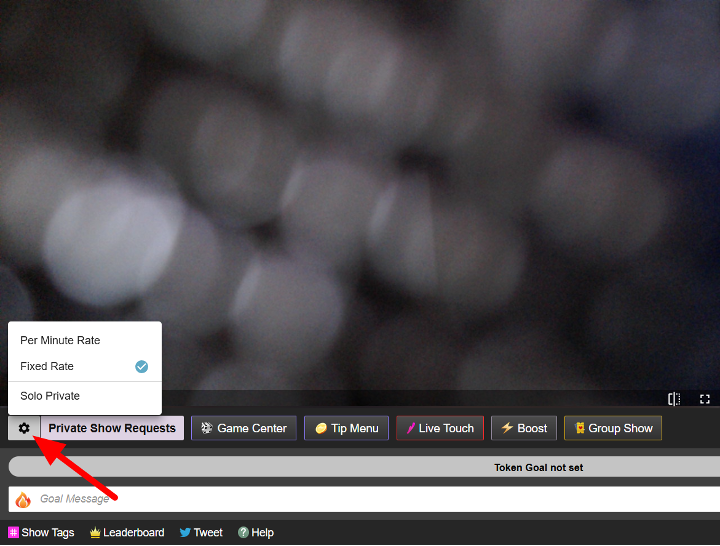
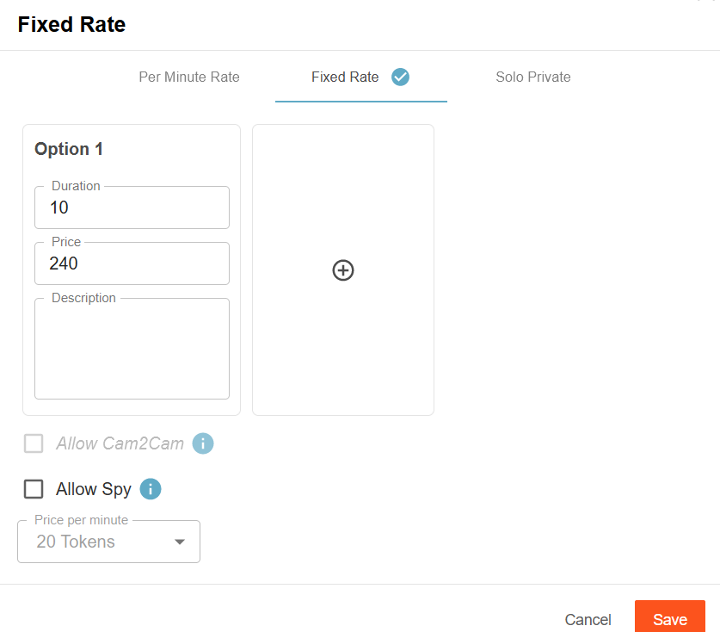
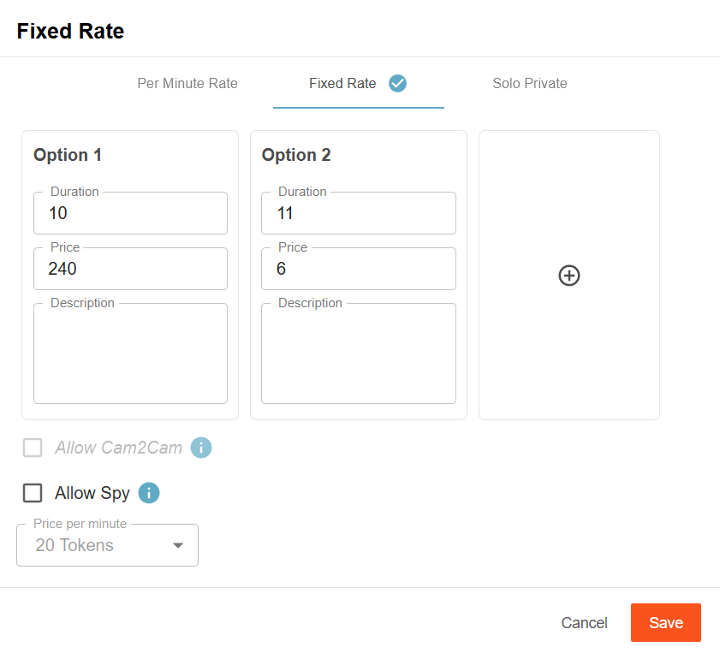
We have added the feature “Fixed Rate” which provides the ability to sell private shows in blocks of time as an alternative to the existing pay-per-minute shows.
The options for this appear in the lower left of your broadcast window after clicking on the cogwheel.
To add additional Blocks of Time options, click on the Plus + icon.
To delete a Block of Time option, click the Trash Can icon that appears at the top right of the option box
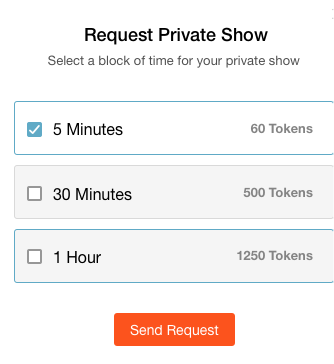
A Viewer will see the broadcaster’s chosen options when clicking on the request private show button
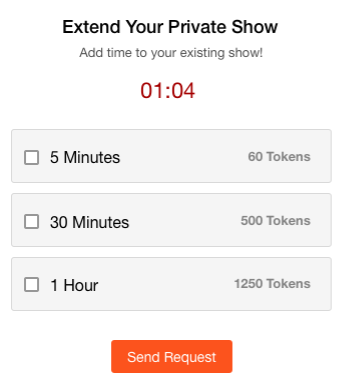
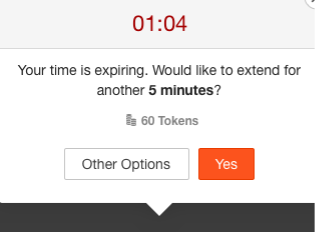
The viewer can choose to extend the show at any time
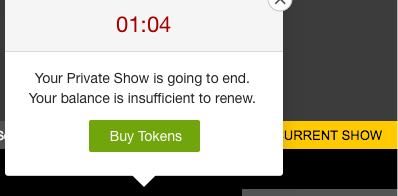
When the purchased block of time is about to expire, a prompt will appear offering the opportunity to extend the show by purchasing an additional block of time, this can be done an unlimited number of times during a show.
Once a viewer’s token balance is too low to purchase further blocks of time a notification will be displayed as below
It is also possible to purchase additional tokens at any time during a show
Please Note:
Spies remain on a per-minute basis when spying a Fixed rate show
Viewers not currently spying or being the primary private show viewer are presented with the amount of time remaining for the block of time in progress.
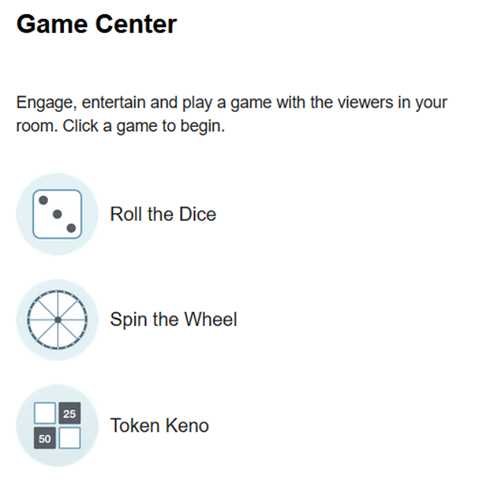
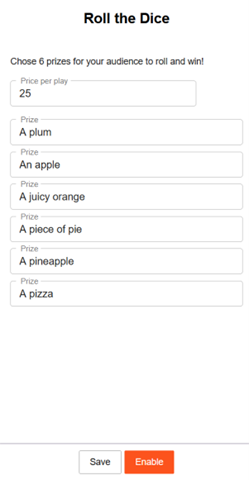
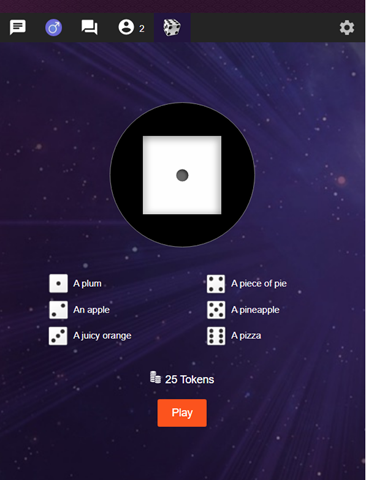
In this game, the broadcaster will have to set a price per roll and set up 6 prizes. The game cannot be started without all 6 options (dice faces) and a price being set.
Please note:
the price input field has a limitation of 3 digits.
the prize input fields have a limitation of 25 characters.
Once the game is started, all viewers in the room will have the Play Roll the Dice button in the action bar under the player and will receive a chat notification that the game is active and the possible prizes.
Once the Play Roll the Dice button is clicked, a game window will be opened over the chat. Here the viewer can see the price per roll, the prizes that they can win, and a Play button, which will randomly choose a prize once it is clicked.
After a roll the game will be paused for 1 minute, to allow time for the broadcaster to give the reward that was won. If they don’t need that much time, broadcasters can reset the timer.
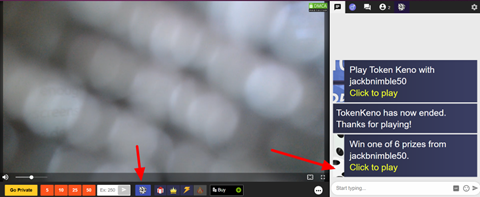
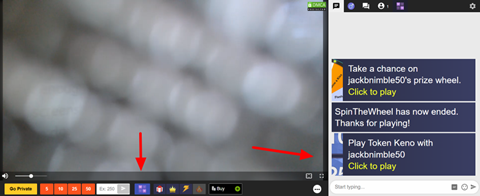
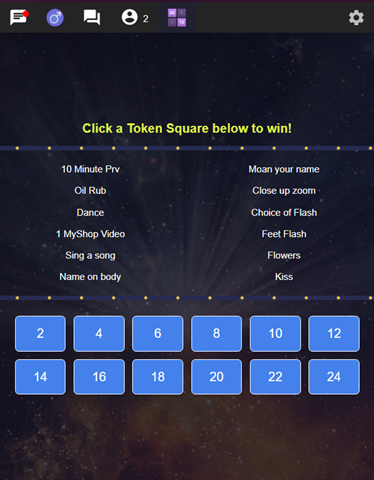
Token Keno
In this game, the broadcaster can set up to 12 prizes with the cost they choose. An option to be added to the game must have a prize and a cost. To start the game the broadcaster has to click on the Start Token Keno button. Once the game is started the options cannot be edited. A chat notification will notify all users that the game is enabled.
Limitations:
the price input field has a limitation of 3 digits.
the prize input fields have a limitation of 15 characters.
All viewers now can see the Play ‘Token Keno’ button in the action bar under the player, and if they click on it, the Token Keno game window will be displayed over chat. Here they can see a list of the prizes they can unlock and the squares they can choose with the cost to unlock them. The viewer is not aware of which prize the squares have. To play the game the viewer must click on the square he wants to unlock. Once he clicks on the square an animation is displayed with an unlocked prize.
A chat notification is sent to inform all users that the viewer unlocked a prize. After a pick, the game is paused for 1 minute, but the broadcaster has the possibility to resume it faster by pressing the Allow Unlock button that replaced the Game Center button. The unlocked prizes are displayed in the game window as greyed out and strikethrough. After the last square is picked the game ends.
The broadcaster can end the game whenever they want. To do so they have to go to the game settings window and click on the Disable button.
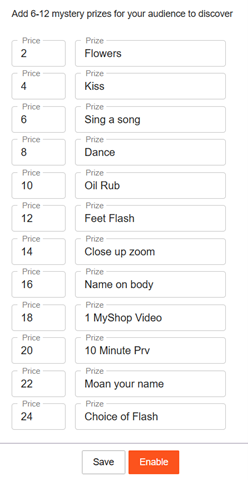
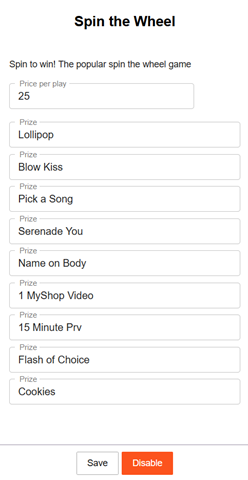
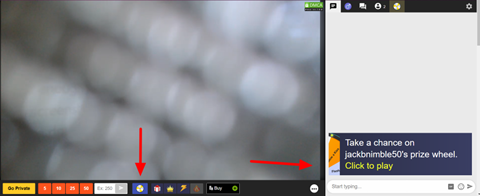
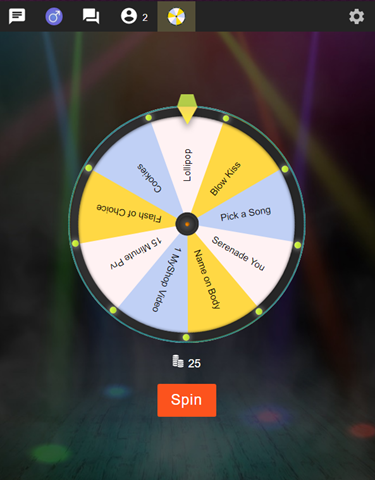
Spin the Wheel
In this game, the broadcaster can set up a number of prizes and a price per spin. The minimum number of prizes is 6 and the maximum is 12. The broadcaster must set the price per spin and also input the minimum number of prizes so that the game can be started.
Limitations:
the price input field has a limitation of 3 digits.
the prize input fields have a limitation of 25 characters.
The viewers will have to pay the price to spin and win a random prize. After the game starts, the “Game Center” button will be replaced with “Spin the Wheel”, on the broadcaster’s side.
After the broadcaster starts a game a chat notification will be sent to all users with all the prizes in the game.
All viewers will see the Play ‘Spin the Wheel’ button, and once they click on it, the Spin the Wheel game window will be displayed over the chat. In the game window the viewers will have a Spin button with the cost per spin, and the wheel with all the possible prizes.
A chat notification is sent to inform all users that a viewer won a prize.
After a spin, the game will be paused for 1 minute, but the broadcaster has the possibility to resume it faster by pressing the “Allow Spin” button that replaced the Spin the Wheel button.
The broadcaster can end the game whenever they want, and they can do it by clicking on the “Spin the Wheel” button and the press “Disable”.
The Activity Feed is CAM4’s platform for sharing content with your fans. You can post photos and videos from your Media Vault to your profile feed, where fans can view, purchase, or unlock them.
Getting Started
Step 1: Upload Media to Your Media Vault
Before creating posts, you need to upload content to your Media Vault:
Navigate to Broadcaster Dashboard → Media Vault from your account menu
Click Upload Photo or Video
Drag and drop your files or click to select them
Supported formats: Images (JPG, PNG) and Videos (MP4, MOV)
File size limits apply (check current limits in upload interface)
Wait for your media to upload and process
All uploads require approval before they can be used in posts (may take up to 48 hours)
Important: Only approved media from your Media Vault can be added to Activity Feed posts.
Step 2: Create a New Post
Once you have approved media in your Media Vault:
Go to your Profile Page
Navigate to the Activity tab (or Feed tab)
Click the Create Post button (usually near the top of your feed)
You’ll see the Create New Post overlay
Adding Content to Your Post
Select Media:
Click Add Media or the upload icon
Choose from your Media Vault tab (shows your approved content)
You can select multiple images or videos for a single post
Navigate through selected media using the arrow buttons
Write Your Post:
Add a text description or caption for your post
Use the text area to share updates, teasers, or context
Step 3: Configure Post Settings
Post Visibility Options:
*� Public (Free):
Anyone visiting your profile can view this post
Great for teasers or building engagement
*� Locked (Paid):
Set a token price for users to unlock this post
Enter the number of tokens required to view
Fans must pay once to permanently unlock
⭐ Fan Club Only:
Only your active Fan Club subscribers can view
Great for exclusive content for paying fans
Encourages Fan Club subscriptions
Media Cover Selection:
For video posts, you can select a custom cover/thumbnail:
The system may auto-select frames from your video
Click to choose your preferred thumbnail
This appears before fans play or unlock the video
Step 4: Publish Your Post
Review your post content, media, and settings
Click Post or Publish
Your post will appear on your Activity Feed immediately
Note: While the post appears immediately, content must remain approved. If moderation flags any issues, you’ll be notified.
Managing Your Posts
Edit a Post:
Find the post on your Activity Feed
Click the three-dot menu (⋮) on the post
Select Edit Post
Modify the cover image, the description, or the cover blur state.
Click Save to update
Important: You cannot change the media files in an existing post. To use different media, create a new post.
Delete a Post:
Click the three-dot menu (⋮) on the post
Select Delete Post
Confirm the deletion
The post is permanently removed from your feed
Viewing Your Activity Feed
Where Your Posts Appear:
Your Profile → Activity Tab:
Shows all your posts in chronological order
Fans visiting your profile see your public posts or locked previews
Fan Club subscribers see exclusive content
Directory Activity Feed:
Public posts may appear in the global CAM4 feed
Helps new fans discover your content
Subscriber Feeds:
Your posts appear in the feeds of users who follow or subscribe to you
Post Insights & Earnings
Track Your Performance:
View post likes and engagement
See unlock/purchase counts for paid posts
Monitor earnings from post sales
Check which posts drive the most Fan Club conversions
Access insights through:
Your Broadcaster Dashboard
Individual post statistics
Media Vault analytics section
Best Practices for Activity Feed Success
Content Strategy:
✅ Mix free and paid content
Use free posts as teasers to drive paid unlocks
Reserve your best content for Fan Club or paid posts
✅ Post regularly
Consistent posting keeps fans engaged
Aim for 3-5 posts per week minimum
✅ Use compelling descriptions
Write enticing captions that make fans want to unlock
Tease what’s in the paid content without giving it away
✅ Price strategically
Start with competitive token prices
Adjust based on engagement and unlock rates
Consider Fan Club exclusivity for premium content
✅ Leverage video content
Videos typically drive higher engagement than images
Short teaser videos work great as free posts
Engagement Tips:
Respond to comments on your posts
Ask questions to encourage interaction
Cross-promote your Activity Feed during live shows
Share your profile link on social media
Frequently Asked Questions
Q: Can I upload videos directly when creating a post?
A: No. All media must first be uploaded to your Media Vault and approved before you can add it to posts. This ensures content compliance.
Q: How long does content approval take?
A: Typically up to 48 hours. Approved media can then be used in posts immediately.
Q: Can fans download my locked content after purchasing?
A: This depends on your downloadability settings in the Media Vault. You can control whether each piece of media is downloadable.
Q: What happens to my old My Shop videos?
A: My Shop content has been migrated to the Activity Feed system. Your approved videos are now available in your Media Vault to create posts.
Q: Can I create posts from my mobile phone?
A: Yes! Log in to CAM4 on your mobile browser and follow the same steps. The interface adapts to mobile devices.
Q: How do I protect my privacy?
A: You can control who sees your profile by limiting what countries can view it in your settings. You can also delete posts at any time.
Q: What’s the difference between locked posts and Fan Club posts?
A:
Locked posts: One-time token purchase to unlock (any user can buy)
Fan Club posts: Only visible to active Fan Club subscribers (monthly subscription)
Q: Can I schedule posts in advance?
A: Post scheduling is not currently available. You must manually publish posts.
Q: Why can’t I see the Create Post button?
A: Ensure you’re logged in and viewing your own profile. The button appears on your Activity/Feed tab when you’re the profile owner.
Need Help?
If you encounter issues with the Activity Feed or have questions:
Never miss a show from your favorite models! CAM4’s Live Show Scheduling feature works like a TV guide for live cam shows. Models can schedule their broadcasts in advance, and you’ll get notified when they’re about to go live.
What is Live Show Scheduling?
Live Show Scheduling lets broadcasters plan their shows ahead of time and share their schedule with fans. When you follow a broadcaster who uses scheduling, you’re automatically subscribed to their calendar and will receive notifications before their shows begin.
Scheduled shows are the same price as regular shows—this feature simply makes it easier to know when your favorite models will be online.
Viewer FAQs
Does Live Show Scheduling require a CAM4 account?
Yes. All CAM4 members (both Basic and Gold) can use the Live Show Scheduling feature. To sign up for a free CAM4 account, click here.
How do I subscribe to a broadcaster’s schedule?
Subscribing to schedules is now automatic through the follow system:
If you’re already following a broadcaster: You’re automatically subscribed to their show schedule
If you’re not following them yet: Visit their profile page. If they have shows scheduled, you’ll see a “Subscribe and Visit Calendar” button. Clicking it will follow them and take you to the calendar
How do I see my Live Show Schedule?
You can view your Live Show Schedule by going to Calendar in your account menu.
What do the colors on the calendar mean?
Orange dots: Live shows scheduled by broadcasters you’re subscribed to
Blue dots: Live shows you’re scheduled to perform (if you’re a broadcaster)
How do I know how many shows are scheduled today?
The number of shows scheduled for the current day is displayed next to the calendar icon at the top of the site.
How many broadcasters can I subscribe to?
There is no subscription limit. You can follow and subscribe to as many broadcasters as you like.
When do I receive notifications?
You’ll receive notifications 15 minutes before subscribed shows begin, giving you time to join when your favorite models go live.
What information can models share about their shows?
Broadcasters can share:
Show duration
Show goals and themes
What they have planned for each show
Teasers about the content
This helps you know what to expect and decide which shows to attend.
Broadcaster Information
As a broadcaster, you can:
Schedule shows up to 90 days in advance
Share your show goals and plans with fans
Build a regular audience by maintaining a consistent schedule
Let fans know exactly when to find you online
Fans who follow you will be automatically subscribed to your calendar and receive notifications before your shows start.
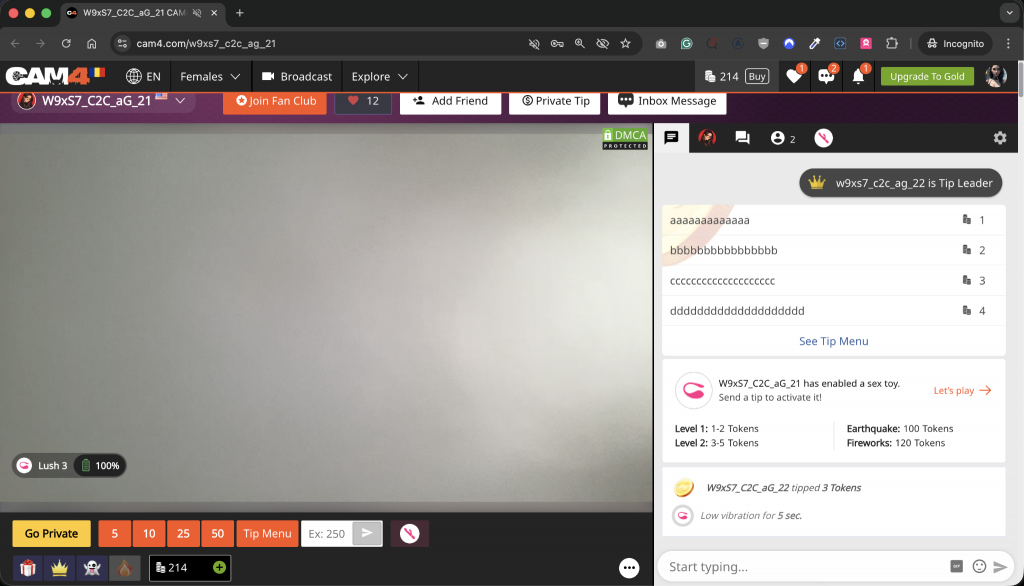
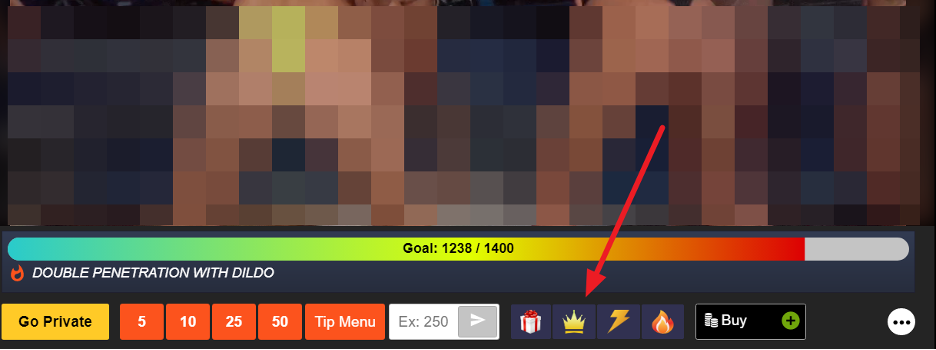
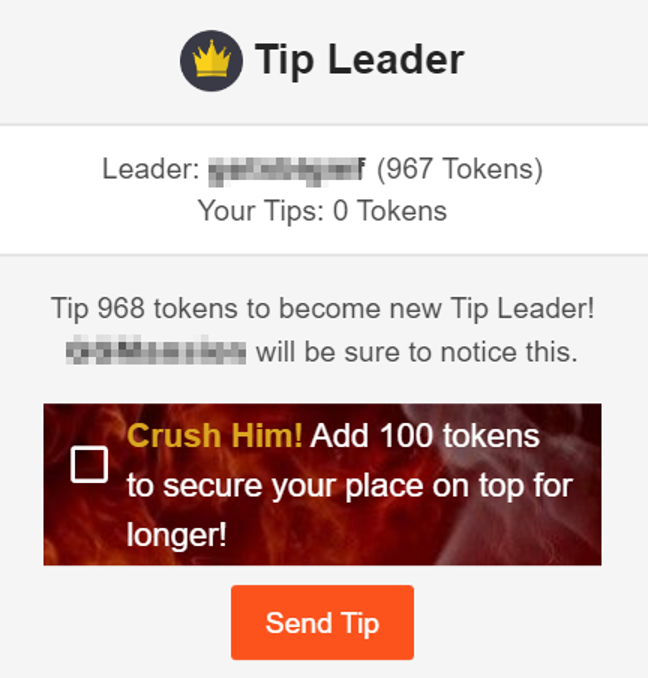
Beat The Leader is a game viewers can play to make sure they are always the Tip Leader in a room – so they can keep getting the attention that comes with being the leader!
How does Beat The Leader work?
The Beat The Leader button gives viewers the option to automatically send a broadcaster enough tokens to become the new tip leader.
How many tokens does the Beat The Leader button send?
After clicking Beat The Leader, you can choose to send enough tokens to match the current leader, plus 1 – making you the new tip leader.
Or, you can choose to CRUSH the current leader by sending an extra 100!
Where can I find Beat The Leader?
Beat The Leader is available on any cam that has tipping enabled. The button will appear below the goal bar once a viewer has become the tip leader.
What if I tip anonymously?
If you send tips anonymously and become the tip leader, you will appear as anonymous in the Beat The Leader menu.